WebCashFlow: In Depth - Scheduled Transactions
Scheduled Transactions
To get a complete view of your receipts and payments, it’s best to use your online banking app to download your transactions as a CSV file and open it in Excel. The file will typically include columns such as Date, Name, Type, Description and Amount (sometimes shown in two columns as Debit (payment) and Credit (receipt). Start by sorting the data by Type, then, within Type, by Description and finally, within Type and Description, by Date. It is likely that this will be quite revealing.
You’ll almost certainly see that many transactions are regular, repeated receipts or payments. These are the ones to focus on, and should be added to Scheduled Transactions. You may also need to create a few more general scheduled transactions to cover non‑regular types of income or expenditure.
Editing a Scheduled Transaction
- Select the transaction to be edited by clicking anywhere on the transaction's row
- Click Edit from the toolbar at the top of the grid.
- Amend as necessary and click Save and Close (or Cancel to abandon the edit) .
Deleting a Scheduled Transaction
- Select the transaction to be deleted by clicking anywhere on the transaction's row
- Click Delete from the toolbar at the top of the grid.
- A dialog will open asking for confirmation of the deletion. Click OK to continue to delete the transaction.
Reorder Scheduled Transactions
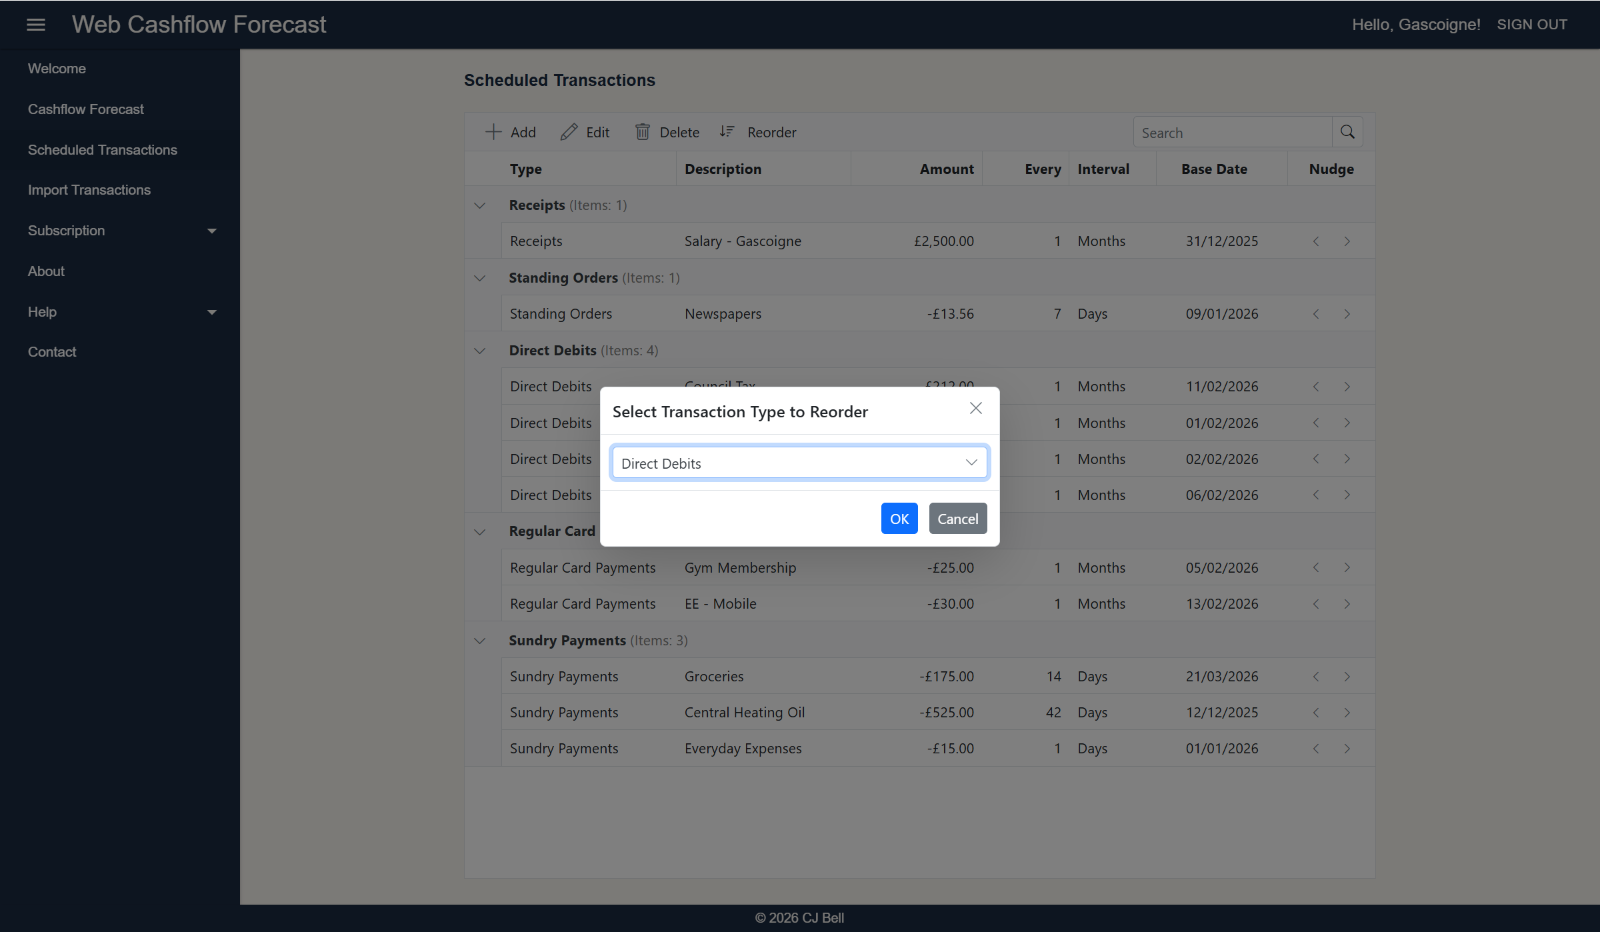
The order in which Scheduled Transactions is displayed. within Transaction Type, is initially the order in which they were entered. This rarely the sequence you want for the final cashflow forecast. To re-order scheduled transaction, (within Transaction Type):
- Click Reorder
- A new dialog opens asking that you select a Transaction Type from the drop-down list. Select a Transaction Type and click OK
Click to enlarge & Esc to close
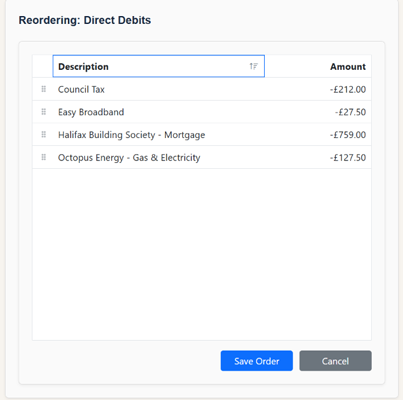
- A Reordering dialog form opens.
- To reorder by Description click the Description heading. (This toggles between ascending, descending and unselected.)
- To reorder by Amount click the Amount heading. (This toggles between ascending, descending and unselected.)
- If neither of these work for you, you can reorder by dragging and dropping a row.
- To do this, make sure that both Description and Amount are not sorted (i.e. the sort icon in the column heading is not shown.)
- Click on the drop and drag handle to the left of the Scheduled Transaction's description and drag the row to the required position.
- Click Save Order.
Contract/Expand Transaction Type Groups
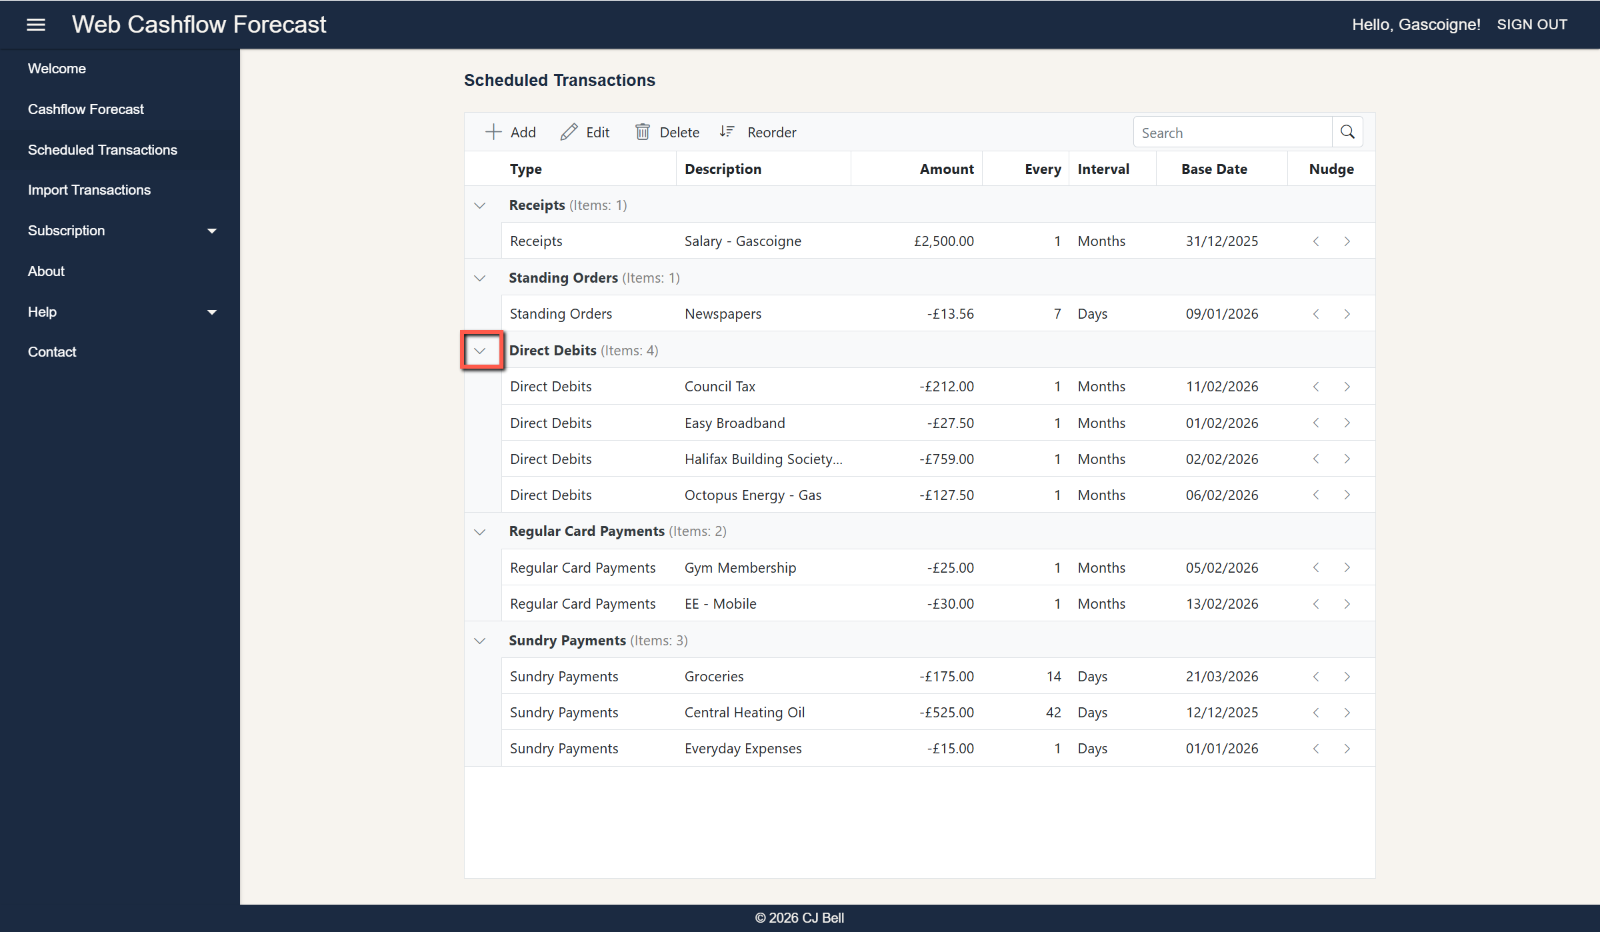
It is probable that you will end up with quite a long list of Scheduled Transactions. To make handling long lists more manageable it is possible to contract (and expand) the Transaction Types sections.
- To contract a Transaction Type group, click on the 'down chevon' in the grid's left margin by the Transaction Type name. The group will be hidden, but group name and number of items will still be displayed.
- To expand a Transaction Type group click on the (now) 'right chevon'.
Click to enlarge & Esc to close

Click to enlarge & Esc to close
Searching for a Scheduled Transaction
With a long list of Scheduled Transactions it can sometimes be difficult to locate a particular transaction. Using the very powerful Search function makes it a breeze to find a transaction or group of transactions.
To use the Search function
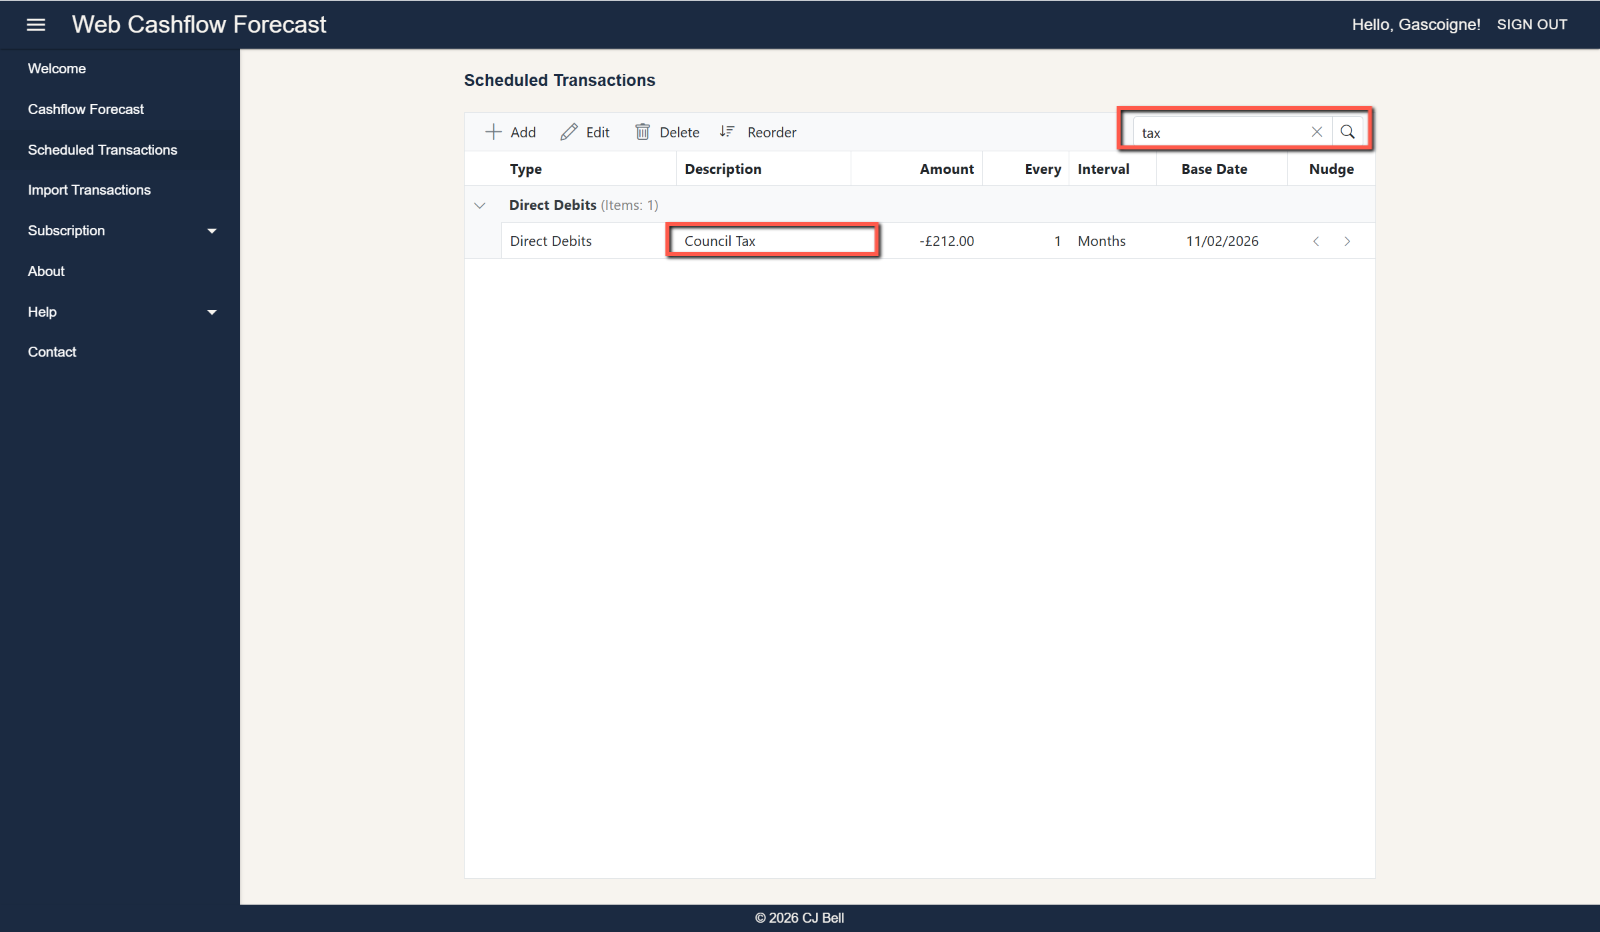
- Click in the Search box and enter all or part the text or number you are searching for.
- Click the Search icon, or press Enter
The list will now ne restricted to those items where the search function found a match.
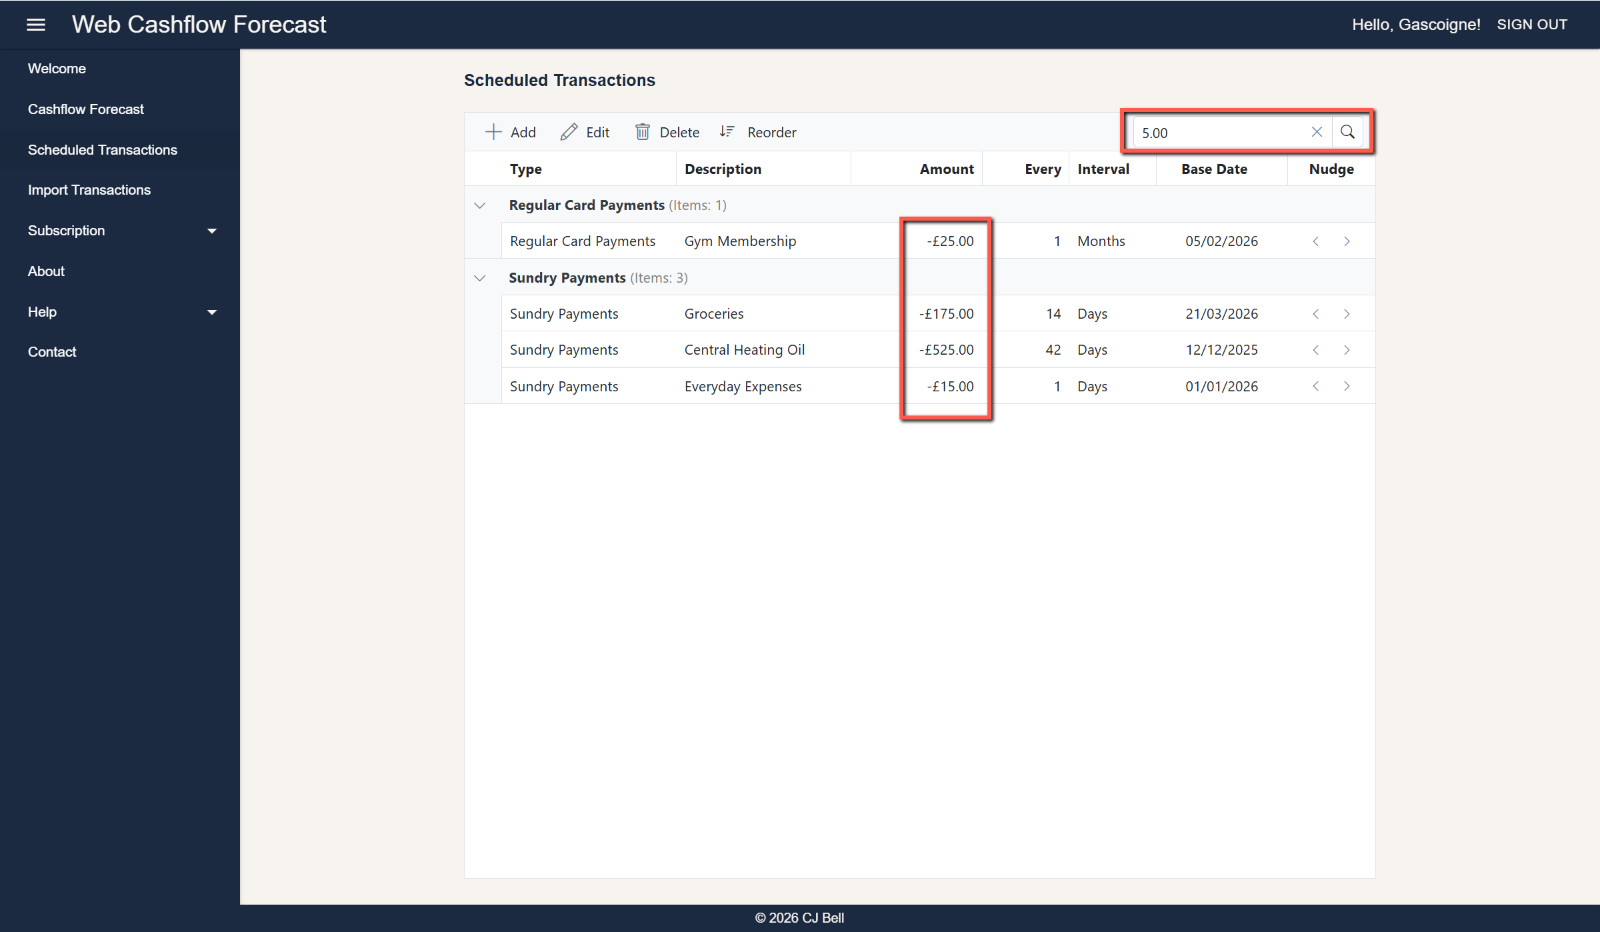
The search function works across all columns, for example, using the data in these illustrations:
- Searching for 'oun' will find 'Council Tax' in the Description column
- Searching for '5.00' will find all amounts that end with '5.00'
- Searching for '5' will find all amounts with '5' anywhere in the number. It would also find any records with '5' in the date or in the 'Every' column.
To clear a search click the X in the Search box.
Click to enlarge & Esc to close
Click to enlarge & Esc to close
Nudge
The Nudge function allows you to change the Base Date of a particular scheduled transaction by clicking the left or right chevrons, either to the day before or the day after the existing Base Date. Clicking the Nudge chevrons multiple times moves the Base Date by multiple days. Nudging the Base Date backwards or forwards is a permanent change (until the next time is is nudged or edited).
Why Nudge a Base Date
The exact day a scheduled transaction appears on your bank statement can vary by a couple of days. For example, a monthly payment might fall on a weekend, or an employer may process salary transfers on slightly different dates each month. Because of this, when you check your opening balance, you may find that some transactions you expected to occur in the next day or two have already been recorded by the bank.
If that happens, and especially if the amounts are significant, it’s worth adjusting those scheduled transactions by moving them back a few days. This prevents them from being counted twice—once as an expected future transaction and again as an already‑recorded one.
To watch a video on this subject click here: In Depth
Next
To learn about importing data, please see Importing Data